Cheeky Chocolate Bats
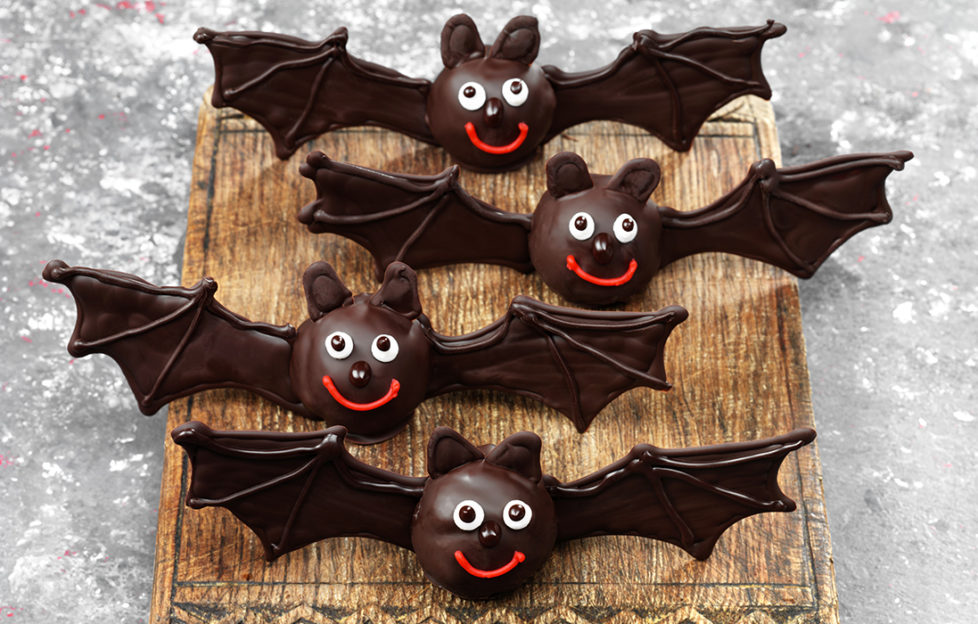
We love these smiling bats – a Hallowe’en treat for all the family!
Makes: 9
Preparation time: 2hr
- Put the cake crumbs in a mixing bowl. Sift the cocoa powder and icing sugar on top. Mix in the melted butter and peppermint extract until well combined.
- Either using a cake pop baller or your hands, form the mixture into nine 4cm diameter balls and put on a plate lined with baking parchment. Cover and chill for 30min until firm.
- Meanwhile, make the bat wings. Break 150g of the extra dark chocolate into pieces and put into a heatproof bowl. Place over a saucepan of barely simmering water to melt. Remove from the water and leave to cool for 10min.
- Using a bat shaped cookie cutter or template, trace 9 sets of wings spaced a little apart on sheets of baking parchment – each wing needs to be about 7cm long, and 4cm deep. Put the parchment, trace side down, on a large board.
- Spoon about one third of the melted chocolate into a small piping bag without a nozzle. Snip a little of the bag away at the end and begin piping round each wing shape to give an outline in melted chocolate. Leave for a few minutes to set before going back and filling in the centres with more melted chocolate to make them solid. Leave in a cool place to set.
- Place a small sheet of baking parchment on another board and pipe the outline of 9 pairs of ears, following the main image as a guide for shape. Once set, fill in the centre with melted chocolate. Leave in a cool place to set.
- Once the wings have set, pipe on the wing detail (see image below) and leave aside until ready to assemble.
- To decorate, break up the remaining extra dark chocolate into pieces and place in a small heatproof bowl. Melt as above then remove from the water and mix with the melted chocolate leftover from making the wings and ears – you may need to re-melt this.
- Line a large board with baking parchment. Working on one cake ball at a time, drop it into the chocolate and gently turn it over using a fork to coat completely. Carefully lift out the ball on the prongs of the fork and gently tap the fork several times on the side of the bowl to remove the excess chocolate and to give a smooth finish. Put the ball on the lined board.
- Whilst the chocolate is still wet, carefully peel off a pair of wings and ears and gently press into the sides and top of the chocolate cake ball – to avoid getting fingerprints on the chocolate, you may prefer to wear thin latex gloves for this.
- Repeat this process to cover and decorate the remaining cake balls, then put the chocolate bats in a cool place to set. If the temperature is warm, cool them in the fridge for about 15min. Keep any remaining melted chocolate for the final decoration.
- Once the bats are set, pipe on the whites of the eyes using designer icing and a big smiley mouth using red writing icing. Re-melt the leftover chocolate as necessary, and either pipe or brush on small amounts for eye balls and noses. Leave for a few minutes to set and then the bats are ready to serve and enjoy!

Bat wing detail